

How to make a disk, propeller and lister hiller for a walk-behind tractor with your own hands?


Since ancient times, a person has been engaged in the facilitation of his work. What kind of devices, machines have not been invented for summer residents in order to reduce their energy consumption when caring for the garden. It is especially difficult to cultivate a potato field, to huddle, to loosen it, if it is large.
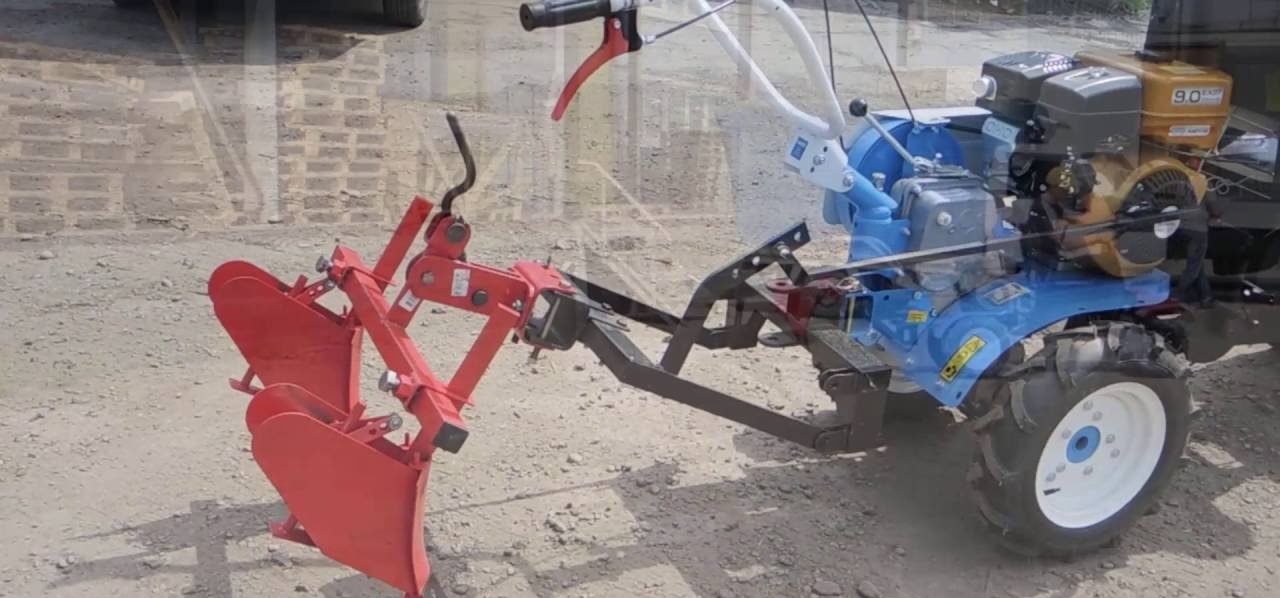
From agricultural machinery for processing small areas, they use walk-behind tractor... The device helps to carry out deep plowing of the land, prepare it for planting vegetable crops. It is easy to care for small beds, but not everyone can handle webs for potatoes by hand. And here additional devices come to the rescue.
Content:
- What is a hiller and what is it for?
- Types of hillers for a walk-behind tractor
- Tools and parts for making a hiller
- Step-by-step production of a lister hiller
- Disc hiller: step by step instructions
- How to make a propeller hiller?
- When and how to use the hiller?
What is a hiller and what is it for?
The main type of care potatoes, without which the vegetable will not give a rich crop of tubers, this is hilling. The procedure is carried out twice a summer, and thanks to it, additional shoots are formed underground in the potato. Tubers are formed on them, which allows you to increase the yield several times. Hilling is referred to as time-consuming care procedures.
Manually, with a hoe, even on a small field, a summer resident will spend more than one day. Not to mention fatigue, sore back, weakness of the whole body after hard work. If there is a walk-behind tractor on the farm, then you can purchase a hiller for it. Putting the baking powder in front, they attach the hiller behind, covering the potato bushes with earth.
There are several advantages of using a hiller.
- It not only makes it easier to work in the garden, but also does it quickly, improving the quality of planting.
- At the same time, energy consumption is also minimal.
- There are several types of attachments that are adjusted to a specific working width, taking into account the size of the field, the variety of potatoes.
- The hiller is not only made high ridges, but also loosened the soil, crushed lumps of earth.
It is not always possible to purchase a device, but you can make it yourself.
Types of hillers for a walk-behind tractor
Attachments to the walk-behind tractor are quite common:
- You can choose a lister type hiller. It is simple to work with and easy to make with your own hands. The design features of the device are such that the hiller can be adjusted by changing the depth and width of the tillage. Simple devices consist of two rigidly fixed plates that diverge at a certain angle.
- The disc shape of the hiller allows the fixture parts to balance. The discs located on the frame grab the soil and sprinkle it around the potato bush. The device has adjusters for the distance between the discs.
- The propeller hiller belongs to complex mechanisms. Such equipment is installed on professional expensive machines.
Devices are classified according to the principle of operation.
- Double row - processing is carried out from both sides of the row at once.
- Single-row devices are characterized by a lack of regulation, therefore, more time is spent on processing with such equipment.
It is easier to make lister and disc devices with your own hands.
Tools and parts for making a hiller
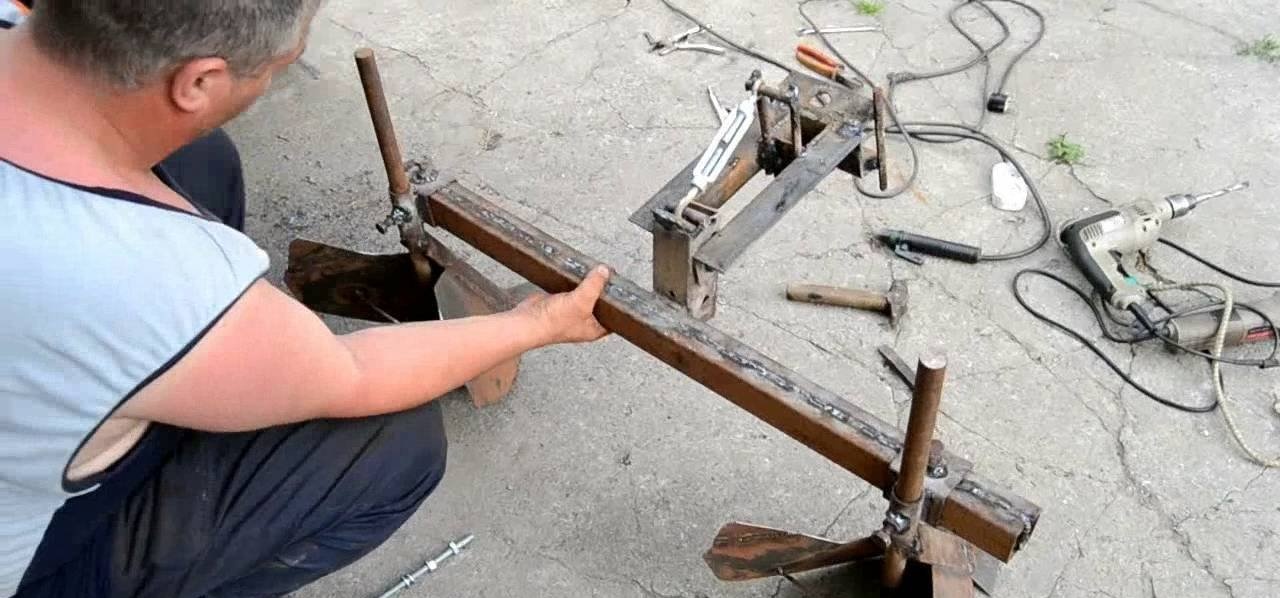
Before starting work, you need to understand the design features of the mechanism:
- It is difficult to imagine a hiller without discs. They are cut from a sheet of iron two millimeters thick.
- It is better to install the discs on the racks necessary in order to adjust the angle of rotation of the parts.
- To fix the parts, adjust the angles of rotation of the disks along the axis, screw lanyards are used.
- All parts are attached to the T-shaped leader.
- The fixing bolts securely fasten the main parts of the device.
Of the tools, the summer resident will need a welding machine. You cannot do without a grinder, electric drill, emery in the manufacture. The workplace is equipped with a vice, files. Before making a device, it is necessary to take into account the weight and power of the equipment.
For attachments with adjustable grip width, walk-behind tractors with a capacity of four horsepower and a mass of 30 kilograms are used. For disks, steel sheets of alloyed material with a thickness of no more than three millimeters are selected. The hiller is assembled only after all the necessary parts and tools have been prepared.
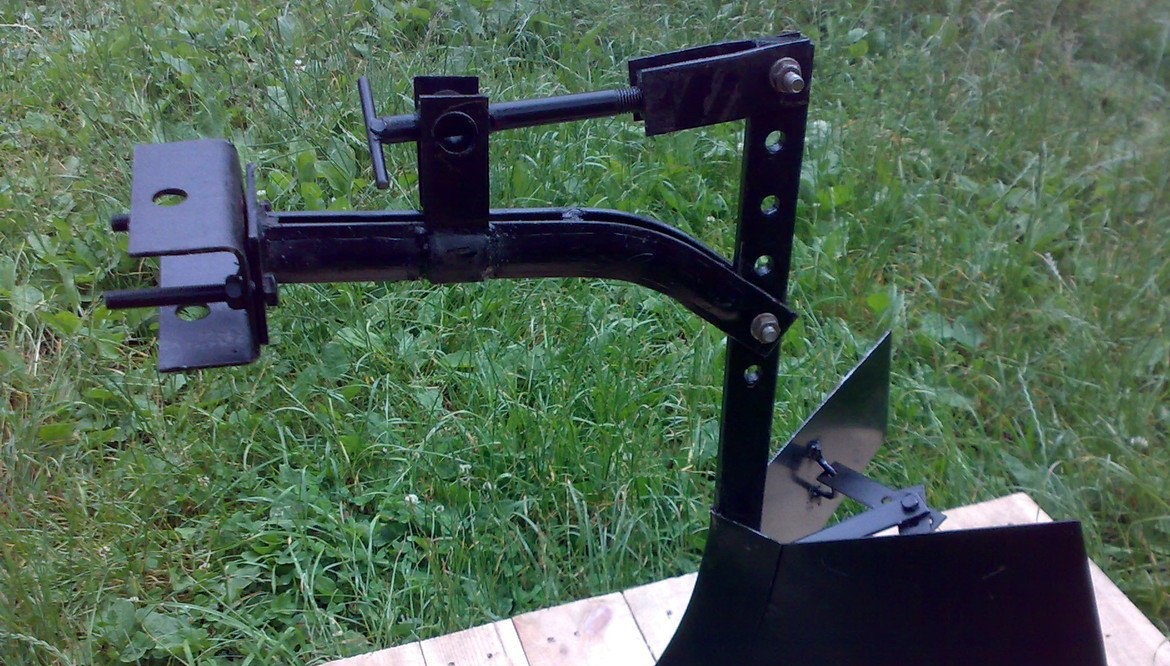
Step-by-step production of a lister hiller
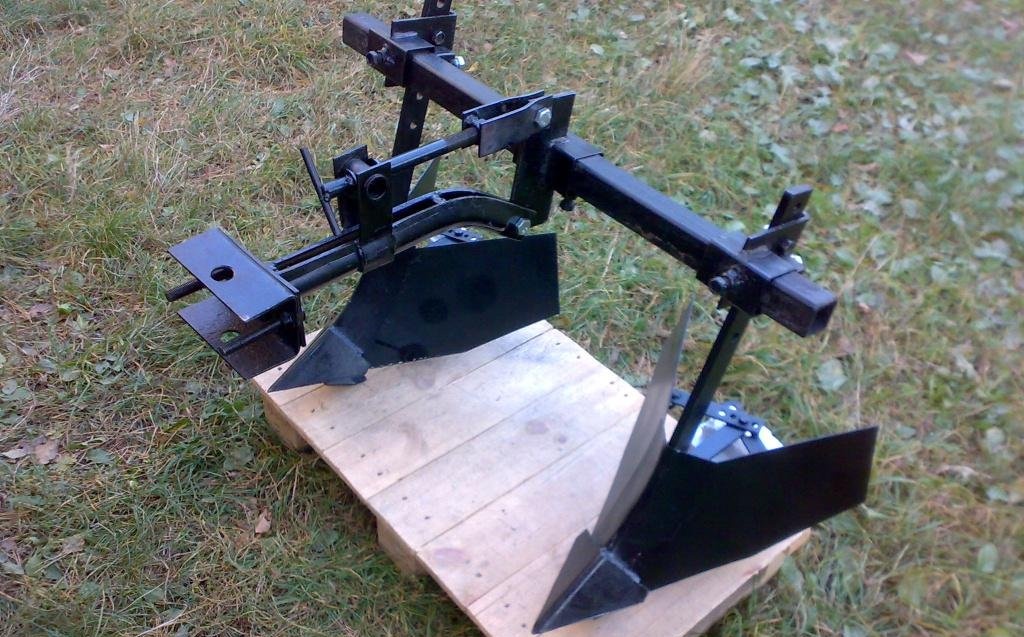
The simple design of the lister, or plow-shaped hiller gives preference to it over other devices. To make it:
- Take a sheet of iron, bend it in the shape of wings. Parts are processed with a grinder and welded at the joints
- To attach the hiller to the walk-behind tractor, you need to take a bracket. We connect the T-shaped leash with two bolts.
- The stopper is inserted into the square tube and pressed from the outside.
- The bracket with the hiller is turned, fixing with two bolts, so that the leash is along the longitudinal axis.
- Fix the position with nuts.
You can save on the details of the hiller by replacing the sheet of steel with an unnecessary lid from a pan with a diameter of forty to sixty centimeters. A simple device is bent with a hammer, the edges are sharpened. A simple hiller is ready to use.
For the construction of a two-row hiller, the base is prepared from an iron sheet of three millimeters.
The bracket will be a strip of steel of four millimeters, and for the field board you need a sheet that is one millimeter thicker than these parts. The main load bearing structure will be the rack. Therefore, it must be reliable and stable.
Even a person ignorant of plumbing can make a lister model of a hiller. The device prevents the walk-behind tractor from overloading when the equipment is buried in dense layers of soil.
Disc hiller: step by step instructions
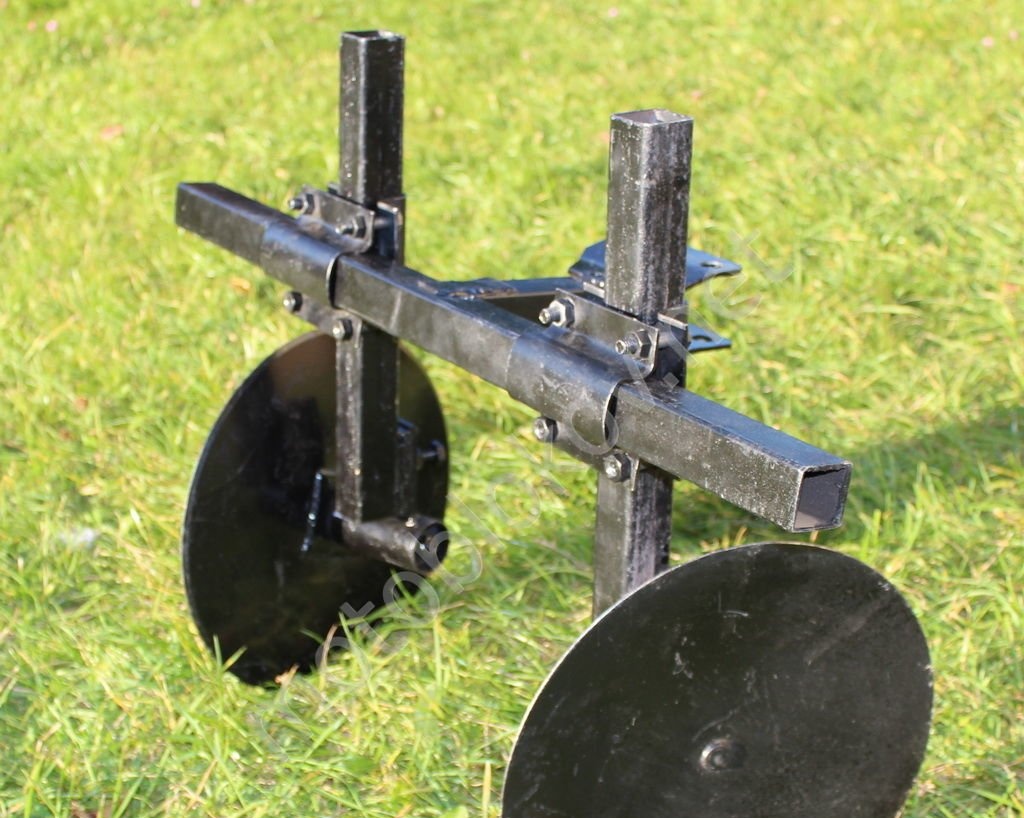
Cultivation with a disc hiller is more efficient, but it is more difficult to build it. The stages of work take place in the following sequence:
- On the basis of a cardboard template, halves are cut out of a steel sheet.
- The workpieces are bent so that from the outside the disk is parallel to the radius.
- By connecting the parts with the union of the radii, they are welded.
- It is necessary to process the seams with a grinder to remove seams and irregularities.
- If the fastening seems unreliable, carry out again with a welding machine at the junction.
- Sand the seams with emery.
- Collect the leash in the shape of the letter T, stands and lanyards to adjust the turns of the device.
- When installing discs, observe symmetry by connecting the wheels with adapters.
- All parts of the hiller are attached to the bracket using bolts with washers and a stopper.
It is important in the manufacture of a disc hiller that the surface of its parts, especially discs, is clean, smooth, without chipping and dents. Better to streamline the discs. So they will turn out the soil less, and the drying of the soil will slow down. A self-made hiller will last a long time, it has more advantages even over purchased models.
How to make a propeller hiller?
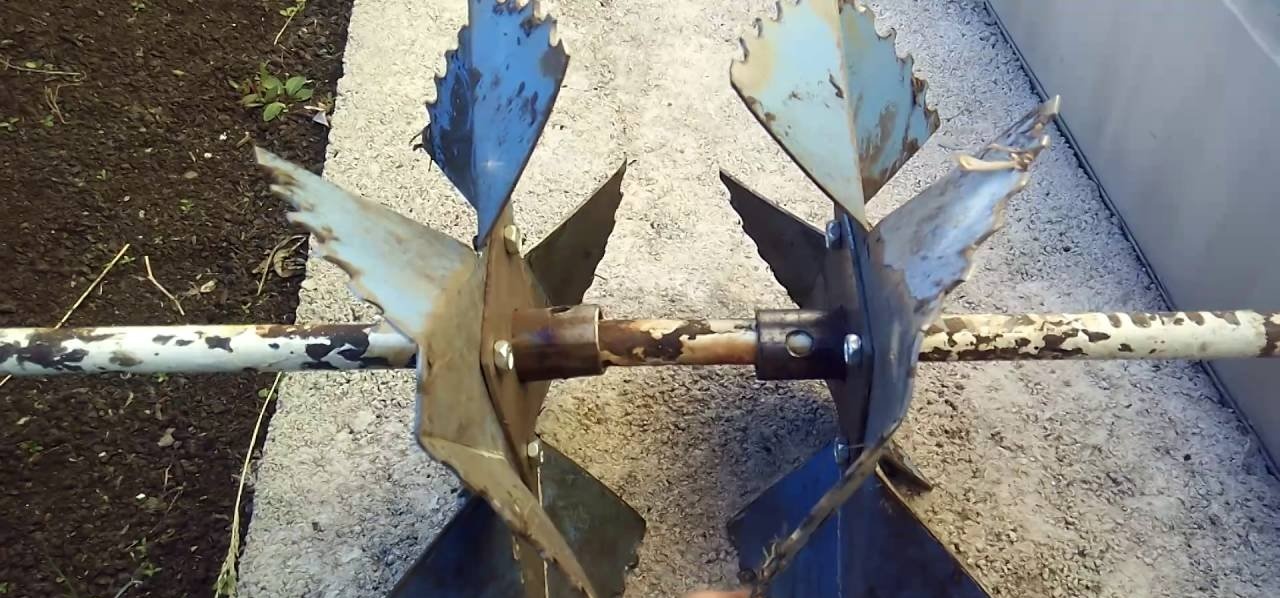
The active type of the propeller-type device is similar in its parameters to the disk version. But all the details of the device are welded. The discs should have additional metal blades and bushings with brackets. The wings must bend outward. The angle of their inclination is varied by the worker depending on the location of the rows of potatoes. Attach additional parts with hinges or rods.
The propeller type of hiller is suitable for walk-behind tractors with two gears.
Then it will be easy not only to loosen the soil, but also to transfer it to the furrows of the rows. It is best to use propeller-toothed rotors on attachments. Then it is easy to form the beds with the technique, loosen and spud potatoes.
The toothed blades are aggressive against weeds, it removes them from the ground by the roots. Inventive summer residents from scrap materials will be able to make themselves a reliable assistant.
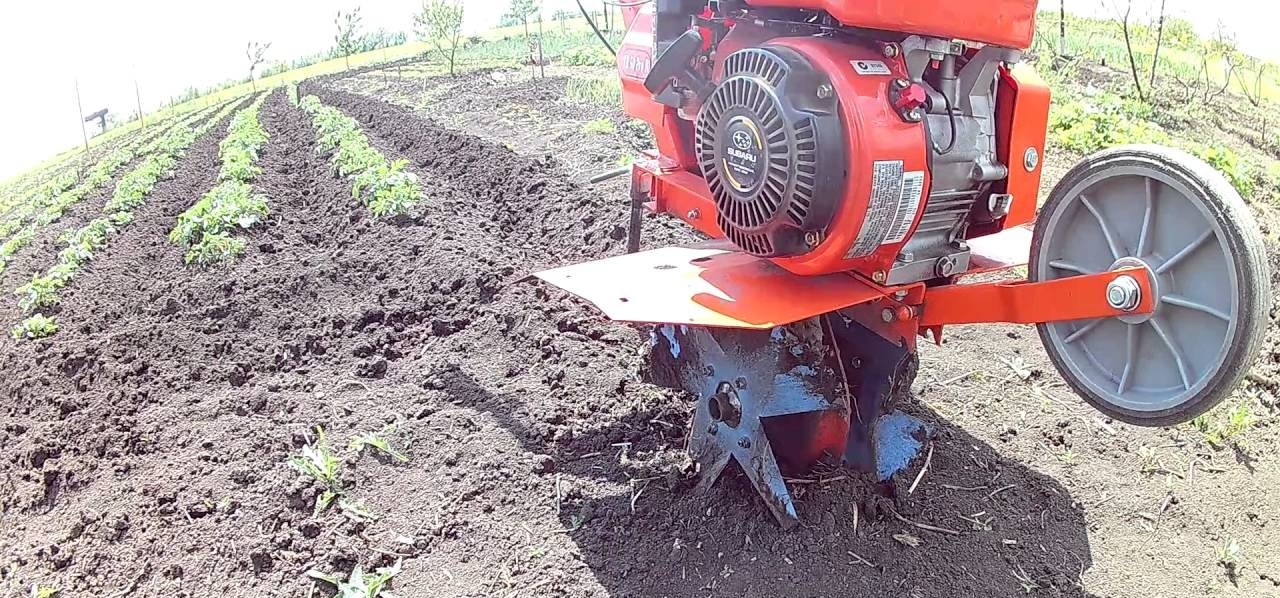
When and how to use the hiller?
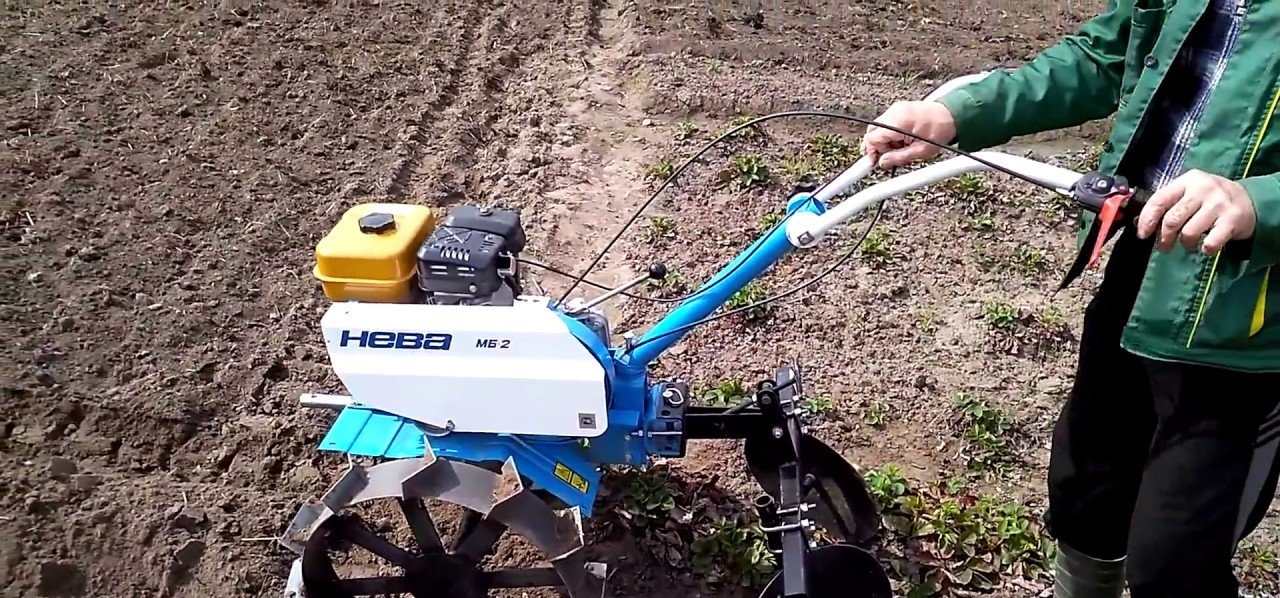
A self-made hiller can be used not only for processing potato bushes, but also for planting a vegetable.
- The equipment attached to the walk-behind tractor passes through the field, pushing the dumps apart. To do this, you can increase the capture of the wings. The track width when planting seed tubers is not less than 60 centimeters. When the furrows after the passage by the hiller are prepared for planting, it remains to spread the potatoes in them at the same distance from each other. Then backfill is also carried out with a hiller. Do not forget to equip the walk-behind tractor with lug wheels during the first procedure. Backfill will require equipping with ordinary rubber wheels.
- The main function of the device is hilling potato bushes. The operation is carried out only when the ground is moistened with rain or dew. Hilling with dry soil will ruin the harvest of vegetables.
- Potatoes are poured for the first time when the height of the stems reaches 15 centimeters. The working device is attached to the walk-behind tractor, placing the stand vertically. When the device begins to dig into or out of the ground, the rack is tilted back or forward slightly.
- It is imperative to set the width between the lower points of the discs before work. It can vary from 35 to 70 centimeters. The angle of attack is not changed, otherwise the hiller will tilt to the side.
- Do not forget about the size of the motoblock wheels. Their width should be within 15 centimeters, and their diameter - 70. Then the wheels will not damage the plants. Adjustment of parameters on the disc hiller is carried out with a leash.
- The second time they spud the potatoes before flowering. Two field cultivation procedures are sufficient per season.
If the parameters of the device are correctly observed, then the bushes potatoes will not be damaged and their hilling will be beneficial for the future harvest.
More information can be found in the video: