

Do-it-yourself bath drain - a step-by-step guide to building a drain


The construction of a bathhouse on the site is an important event. And it is necessary to approach it seriously, having considered all the nuances of the operation of the building in the future. It is especially necessary to think over how the water will drain from the bath, which system is better to use. Let's take a closer look at how to properly organize the drain in the bath and how to do it yourself.
Content:
- Bath floor: material and structural features
- Tips for choosing a way to drain water
- What tools do you need?
- The choice of material for draining
- How to calculate the amount of material for drainage?
- Step-by-step construction of a drain in the bath
- Outflow of water into the sewer system outside the bath
- Outflow of water into the pit
- Outflow of water into a drain well
- How to drain water into a drainage well?
- Soil filtration method
- Using septic tanks to drain water
- Bath water trap
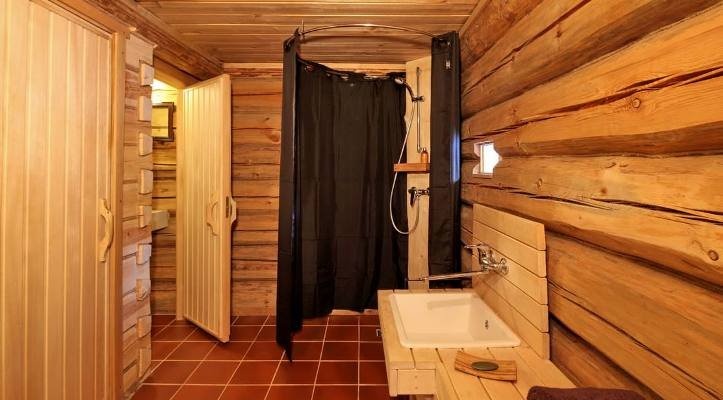
Bath floor: material and structural features
To make it convenient to wash in the bath and not to feel discomfort, it is necessary to install the correct water drain. When the device is installed, they think over which system to use. And here the material from which the floor in the bath is made plays a role. It is also important to know at what level the soil freezes in winter, what is the composition of the soil on the site.
The drainage design of the bath depends on the material from which the floor is made.
Usually either wood or concrete is used. A floor made of natural material is laid so that there are gaps of 4-5 centimeters between the floorboards. This will allow water to flow freely between the boards, and ventilation will allow the wood to dry out and not rot. A feature of the floor is that the logs are removed and dried as needed.
The floor is made of impermeable wood and is laid on a concrete base. It should be sloped for water drainage. A solid floor is made of oak, larch or pine. The disadvantage of such a floor is its rapid wear, since there is no air flow to it, and it is always in a wet state.
The concrete floor is chosen for baths, which are operated all year round. When laying, adhere to the sequence of layers of:
- gravel cushion
- screeds
- vapor barrier
- insulation - expanded polystyrene
- waterproofing with a bituminous primer
- screeds
- facing tiles
Depending on the floor, a system of water outflow from the bath room is also performed.
Tips for choosing a way to drain water
You can equip the drainage system in the bath in different ways:
- At the time of laying the foundation of the structure, a pipe is built in to drain water. It is installed at an angle. Choose straight pipes without bends and elbows.
- A pit is equipped to drain water outside the building. It should be located at a distance of 5-6 meters from the wall of the bath. It is better to reinforce the walls of the well with concrete rings.
- Drainage pits are equipped with special filtering materials: gravel, broken brick, pebbles. They help purify waste water.
- A hole is dug under the floor of the bath, filling it with sand and rubble.
- To use the water from the bath for irrigation, you can arrange a sump, into which water flows through the pipeline. There it is cleaned and through the irrigation system it gets to the beds.
- If possible, then the drain is taken out to the central-type sewer system. But this requires special permits.
- In the washing room, you can arrange a hole for water outlet in the floor or at the bottom of the wall, corner of the room.
- If the soil on the site is sandy, then a drainage well device is suitable for the outflow of water from the bath. On clay soils, drain wells are equipped, which require periodic cleaning.
They choose the method of water outflow from the bath in accordance with the capabilities of the summer resident, his ability to independently build a drainage system.
Useful video on how to make a do-it-yourself drain in the bath:
What tools do you need?
A do-it-yourself drain device involves the use of tools that are difficult to do without.
- Drain wells or a sump are traditionally dug with a shovel. It must be selected so that it can penetrate even hard ground.
- Measure the distance and depth of the drain well with a ruler. And pour crushed stone or pebbles, sand as a drainage layer with a shovel. For convenience, the material is brought in a wheelbarrow.
- To mix the mortar, if the walls of the well will be cemented, a concrete mixer is needed. For a shallow well, you can stir the solution manually.
- The grinder is used to saw off pipes lengthwise.
All the necessary tools are prepared in advance, taking into account the design of the drain.
Selection of materials for draining
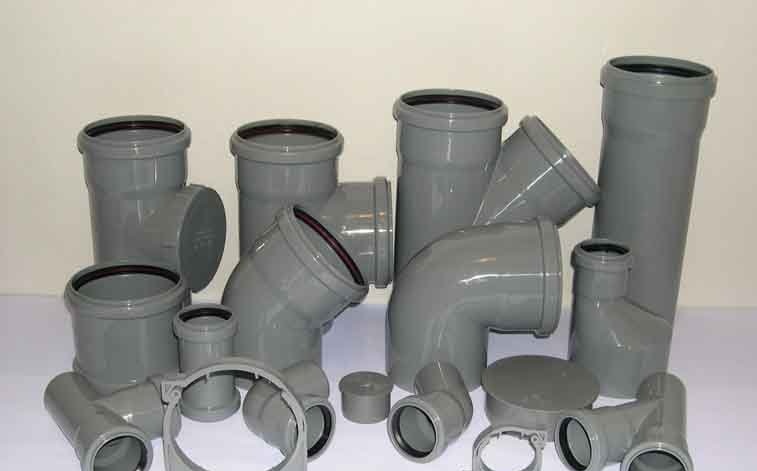
Of the main materials for the drainage of water from the bath, pipes made of polyvinyl chloride or plastic are required. Joints and adapters are selected for them. Pipes with a diameter of 11 centimeters are best suited for horizontal installation. For vertically installed pipes, a diameter of 50 millimeters will be sufficient. The pipe wall thickness should not exceed 2 millimeters.
Materials are selected in advance, after the drainage scheme is ready.
Indoor water runoff is prepared from asbestos pipes or galvanized gutters. It is better to purchase a drain body in a specialized store; siphons are also selected there.
From available tools, you can strengthen the walls of the well outside the bath with barrels or tires from cars or a tractor. For the drainage layer, crushed stone, pebbles, coarse sand are needed. Geotextile will help filter wastewater.
How to calculate the amount of material for drainage?
In order not to acquire unnecessary materials, it is necessary to correctly calculate the total length of the drain pipes. Usually pipes are laid at a distance of 5 meters from the walls of the bath into a drain well. From here, the length of the pipes is calculated. The depth of the pit should be within 2 meters in diameter - 1.5.
Therefore, 2 meters will be enough for a corrugated pipe. If the pipe diameter is 11 centimeters, then the insulation is not needed. With a smaller diameter, insulating materials are acquired. Tees with an angle of 110-90 degrees are needed.
How much sand and coarse gravel to take for drainage is calculated taking into account that the layer should not be less than 20 centimeters.
The number of joints and adapters is selected so that there are as few branches as possible. Otherwise, the pipes will become clogged and the system will have to be disassembled and cleaned. It is best to build a diagram of the bath drainage system and use it to determine the amount of materials required for the arrangement.
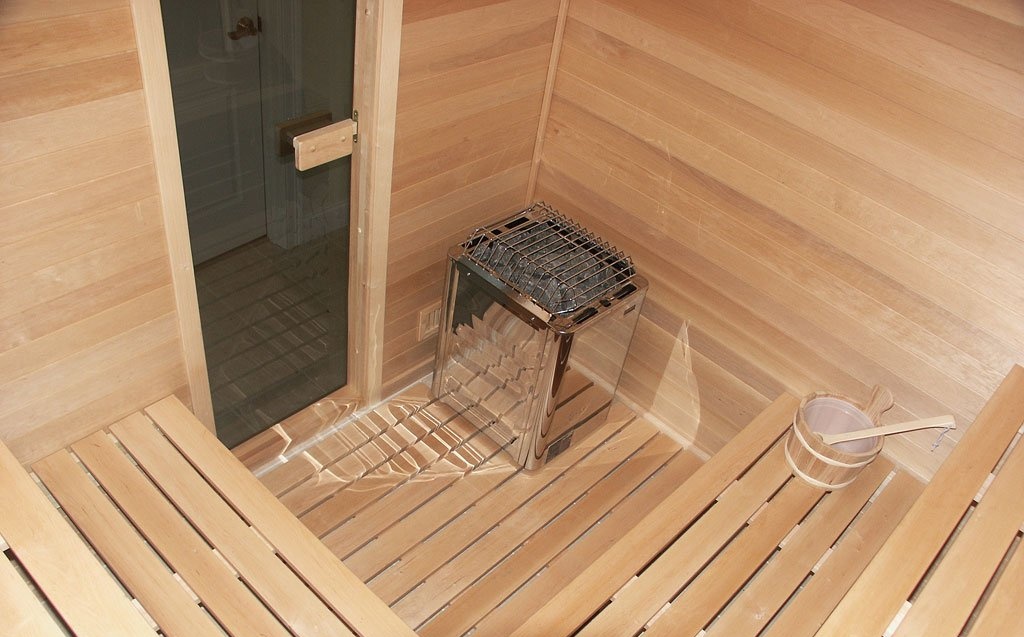
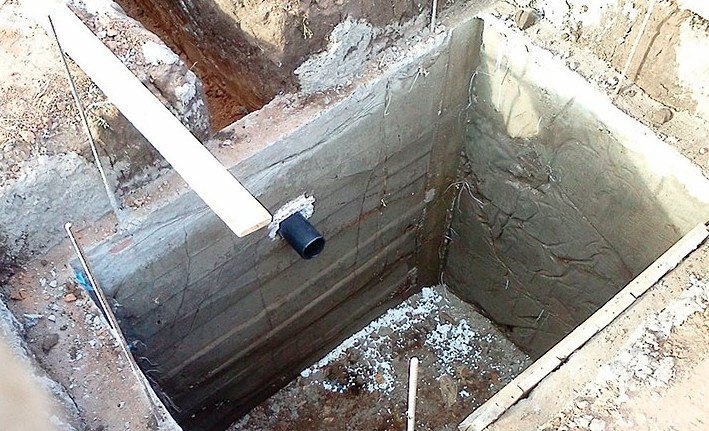
Step-by-step construction of a drain in the bath
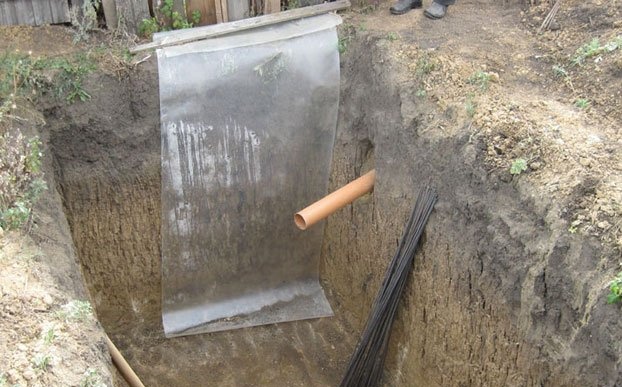
They begin the construction of the sink by choosing a place for the pit. This could be an area under the floor. Then dig a hole before laying the floor. It is important that groundwater does not come close to this place. Otherwise, instead of the outflow of water, a "swamp" will form under the floor. Hence the constant dampness and mold on the walls of the room.
A hole outside the bath is dug taking into account how many people will wash in the bath.A small family needs a well that can receive up to 60 liters of water. After digging a hole, it is necessary to strengthen the walls of the well. For this, fragments of bricks and tiles are also suitable. Outside the building, a metal barrel without a bottom is inserted into the well. Then the walls will not crumble, and the water will go into the ground. Car tires, concrete rings can become a replacement for the barrel.
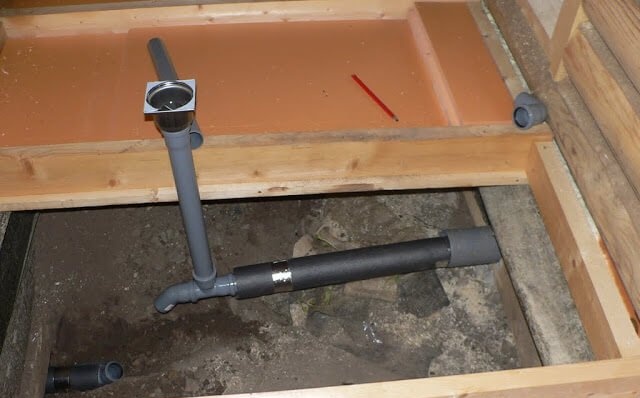
The drain in the bath is done in the floor or near the wall.
For this, the floor is concreted so that there is a slope of 3-5 degrees to the place of discharge. The trap is a siphon with a water seal, covered on top with a grate for collecting small debris. A vertical pipe embedded in the floor connects to the sewerage sections laid in trenches. Horizontal pipes are led into the manhole. They are placed in the ground, previously wrapped with insulation. In areas with warm winters, insulation can be dispensed with. The pipes are laid below the freezing point of the soil in a specific area, otherwise the system, having frozen, will fail.
Outflow of water into the sewer system outside the bath
In order not to contaminate the soil of the site with sewage, they are trying to remove them from the bath into the sewer already installed in the local area.
For this:
- A pipe is built into the foundation. Additional sections of the pipeline are brought to it with the help of joints.
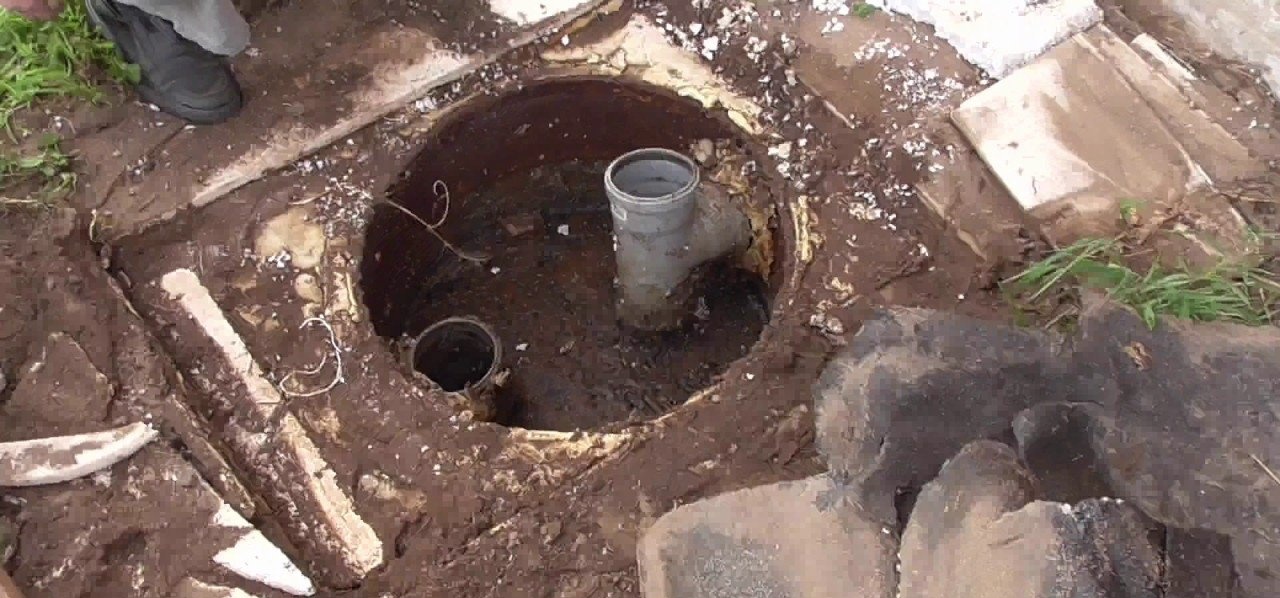
- A pit 60-70 centimeters deep is made in the leaking floor. A trench is drawn from it to a sewer well.
- Pipes are laid at the bottom to drain water from the bath room. Thus, water will drain directly into the sewer, which, as it is filled, is cleaned by special services.
This way of outflow allows a large number of people to take bath procedures.
Outflow of water into the pit
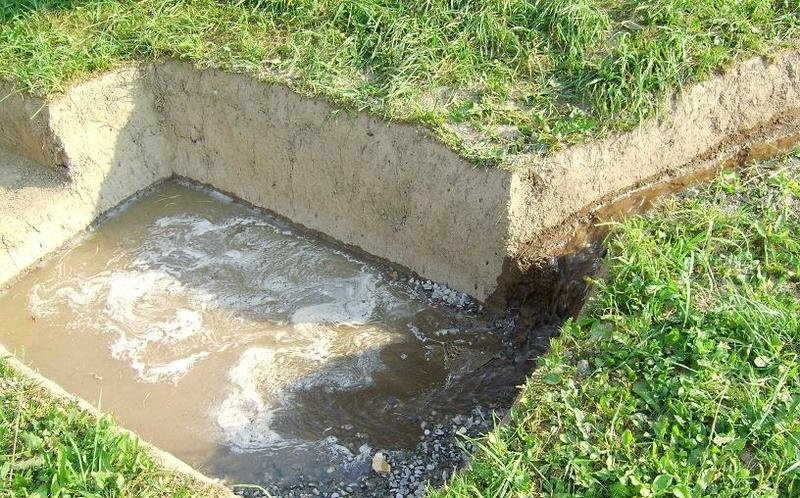
One of the simplest ways to organize a drainage system is a sump. The recess is made under the floor, partially filled with drainage materials. If the floor is leaking, then no more fixtures are needed. Water will drain into the pit during washing. For a solid wood and concrete floor, a hole is required into which water will drain. It is done near the wall or in the middle of the floor.
Despite the simplicity of the pit device, it is better to use it when the bath is operated only in summer.
The disadvantages of the system are the erosion of the bath foundation due to the standing of water under the floor. In addition, soil erosion under the building can also occur, which leads to a decrease in the service life of the premises. It is necessary to improve the system by equipping it with a water seal piping device.
When arranging the drain, the composition of the soil is taken into account. After all, the soil, clayey in structure, will not absorb moisture well, the liquid will stand under the floor, spreading a stench.
Outflow of water into a drain well
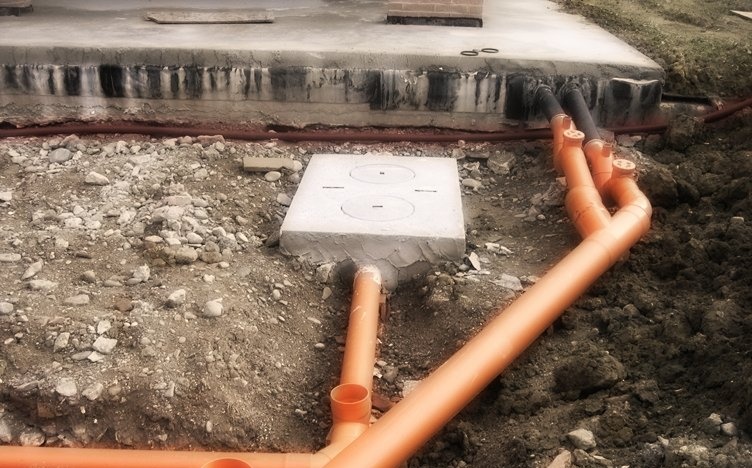
It is best to drain the water from the bath into a drain hole, which is dug outside the room. They dig a drain well at a distance of 5 meters from the bath. Its walls are reinforced with either brick or concrete rings. Someone uses car tires. A trench is brought to a drain well and a pipe is taken out there. The well is closed with a lid. The disadvantage of this type of drain is that over time the bottom of the pit becomes silted up, so it will need to be cleaned.
How to drain water into a drainage well?
The difference between a drainage well and a drain well is the placement of materials in it for filtering water from a bath. This will help conserve moisture by using it to water your garden. In addition, drainage protects the soil from erosion, protects the base of the bath from dampness.
Construction features:
- At the heart of the well is a container with a diameter of one and a half meters. Polyethylene pipes 5 or 11 centimeters in diameter are carried out from the bath.
- Sand is poured at the bottom of the trench, carefully tamping it, then the walls and bottom are covered with geotextiles.
- A perforated pipe is placed on a 10 cm thick layer of crushed stone. NS
- You can drain the drain from an asbestos or plastic pipe by making holes in it. It remains to wrap all the components of the pipeline with geotextile and sprinkle it with earth.
- The trench goes into a pit, the bottom of which is concreted and covered with 20-30 centimeters of rubble.
A drainage well is suitable in those areas where groundwater is high.
You can learn more about how to properly drain in the bath from the video:
Soil filtration method
The main thing in the filtration system is the choice of a place for a septic tank, from which pipes will depart for distributing purified water throughout the site.
- For the filtration device, you need to lay a pipe at the bottom of the trench to a depth of one and a half meters.
- Holes are made in it. At the top of the pipe, the hole diameter will be smaller than at the bottom.
- The ditch is 50 centimeters long or 1 meter at an inclination of one and a half degrees.
- To prevent the soil from silting up in the trench, you can lay geotextiles on the bottom or make a cushion of rubble and sand.
- The laid pipeline is covered with earth.
- Together with the drain pipe, a pipe is installed vertically, which is necessary to supply air to the inside of the well.
- Its height reaches half a meter, and a protective valve is placed on top.
Replace gravel and sand in the trench every 10 years.
Using septic tanks to drain water
A pit septic tank is made from large plastic or metal pipes. We install a container 1.5-2 meters deep in the pit. A pipe is brought to the tank, which is located below the level of soil freezing.
A feature of a septic tank is that it can be arranged autonomously. It will receive water drains not only from the bathhouse, but also from other buildings. Thanks to ventilation, the effluent will be treated with an anaerobic method. Treated water can be piped into the garden. The only drawback is that you have to work hard to dig holes and trenches.
Bath water trap
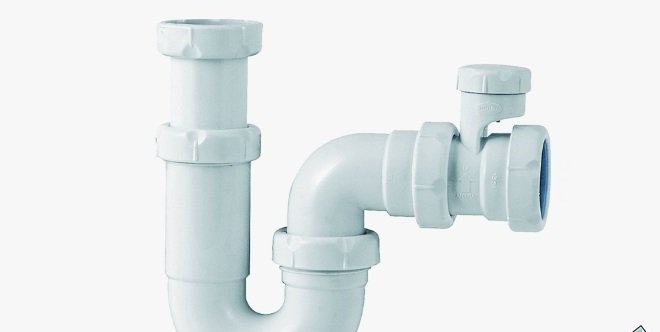
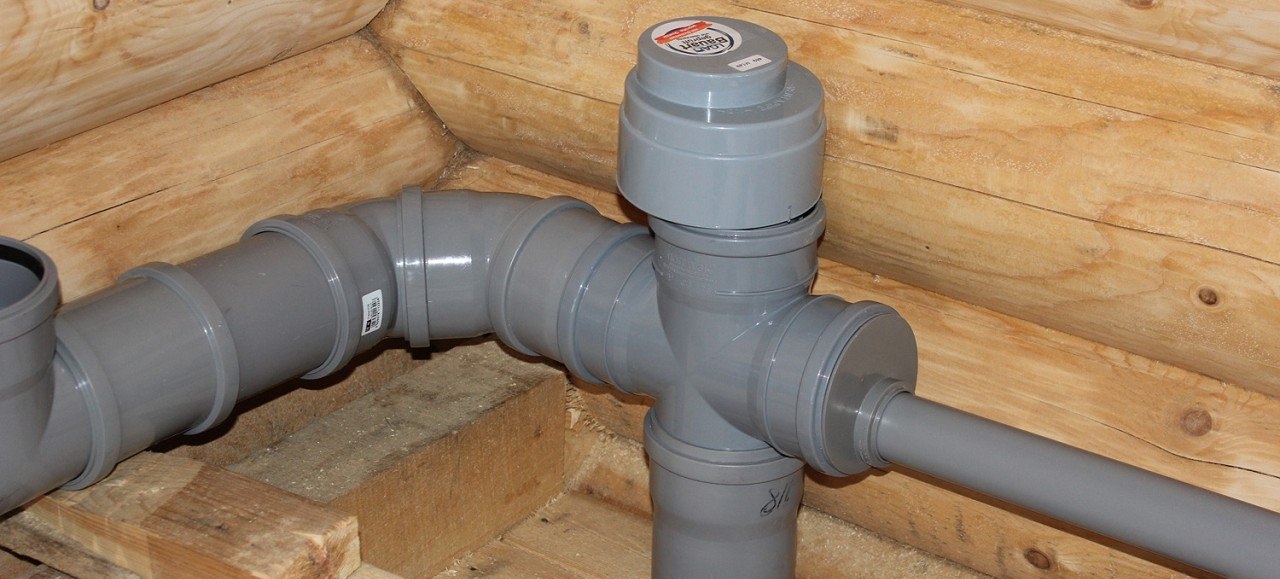
Even a properly organized outflow of water from the bath leads to the appearance of an unpleasant odor in the washing room. Water stagnates in pipes and stench appears. You can get rid of it by installing a water seal.
A metal plate can act as a shutter, which is attached to the pipe in three places. You can replace the plate with a regular rubber ball. As soon as the water fills the sump, the passage for water into the drain pipe opens. As the water drains out, the shutter will return to its initial position.
The main condition for the hydraulic seal device is its tightness.
Periodically, it requires flushing. Therefore, it is necessary to install it in such a way that it is possible to clean the device. An ordinary siphon is also suitable as a shutter, which will play the role of a sump. The upper part of the siphon, embedded in the floor, must be disassembled, as it must be periodically cleaned.
You can purchase a water seal for pipes with a diameter of 5 or 11 centimeters in the store. They are 2 glasses inserted one into the other. By blocking the access of air from the pipeline to the bath, the water seal prevents the fetid odor from spreading upward.
The drain for the bath must be carried out correctly so that the structure lasts as long as possible. The drain device depends on which floor is mounted in the bath, on the composition of the soil at the site, the level of soil freezing.
For me, it’s better to do it well once, than to redo and pay money again for materials that were spoiled and rotten. I liked the penultimate and last option the most.
In this sense, I was probably lucky, because on one side of the site there is a drainage ditch (along the road) and in order to build a drain, it was not necessary to dig a well. Water drains directly into it.